


Varnishing Basics
The art of varnishing wood goes back a long way, and over the years new techniques and products have been developed to make it easier to create the ultimate in brightwork.
Browse Varnishes
The following tips on how to varnish wood apply to both boats and other wooden items. These basic concepts can be applied to all of your paint and varnish projects, so please read them carefully.
The traditional key to any great looking (and successful) varnish job is to build up numerous coats of the best varnish you can afford, sanding in between each coat until a flat and uniform surface appears. This is the result of many centuries of experience and knowledge gained through trial and error. It can be a time-consuming process, but the final result is well worth the effort. A solid coating of varnish will protect and preserve the wood, while also enhancing the natural beauty of the grain in the wood.
220 grit sandpaper is more than sufficient to use because the marks it leaves behind are smaller than the human eye can distinguish in the wood (as long as you sand in the same direction as the grain in the wood), but those same marks are large enough to provide a “tooth” in the surface for the next coat of varnish to adhere. And if you accidentally sand through the finish during later coats it will not be apparent in the final coat (as long as you remember to sand in the same direction as the grain of the wood).

A coarser grit could be used, but it will leave visible marks that are impossible to hide in the final coat of varnish. A finer grit can be used, but it will take longer to achieve the same results, and may not be as effective in creating a good bond between coats of varnish. A finer grit will also lead to more sags in the varnish, especially on vertical surfaces, since there is no “tooth” for the varnish to cling to and it sags down.
Sanding between coats of varnish is important because it achieves two things: First, it knocks down the “high spots” and second, but more importantly, it provides a tooth for the next coat to adhere to. Otherwise, the subsequent coats can delaminate and lift off in large sheets. This can be seen as large bubbles that appear with time, but where there is still a varnish layer underneath.
The other advantage that sanding provides is that is presents a frosted surface that makes it easy to see where “holidays” or voids may be in the application. You will need a light source that is off to one side so you can look across the finish and see where your wet edge is and whether there is any “holiday” that needs to be touched up.
If you look closely at a cross-section of the surface of wood, there are “mountains” and “valleys” that occur naturally in the wood. These “mountains” are typically winter growth in the wood, while the “valleys” are normally summer growth which tends to be softer. This problem is made worse when you do not use a sanding block because your fingers push the sandpaper down into the softer wood, but it occurs even when you do use a firm sanding block.
Please remember to use a sanding block to ensure that your fingers do not push the sandpaper down into the valleys, or it will take a lot longer to build up the finish to the point where it is ready for the final coating of varnish.
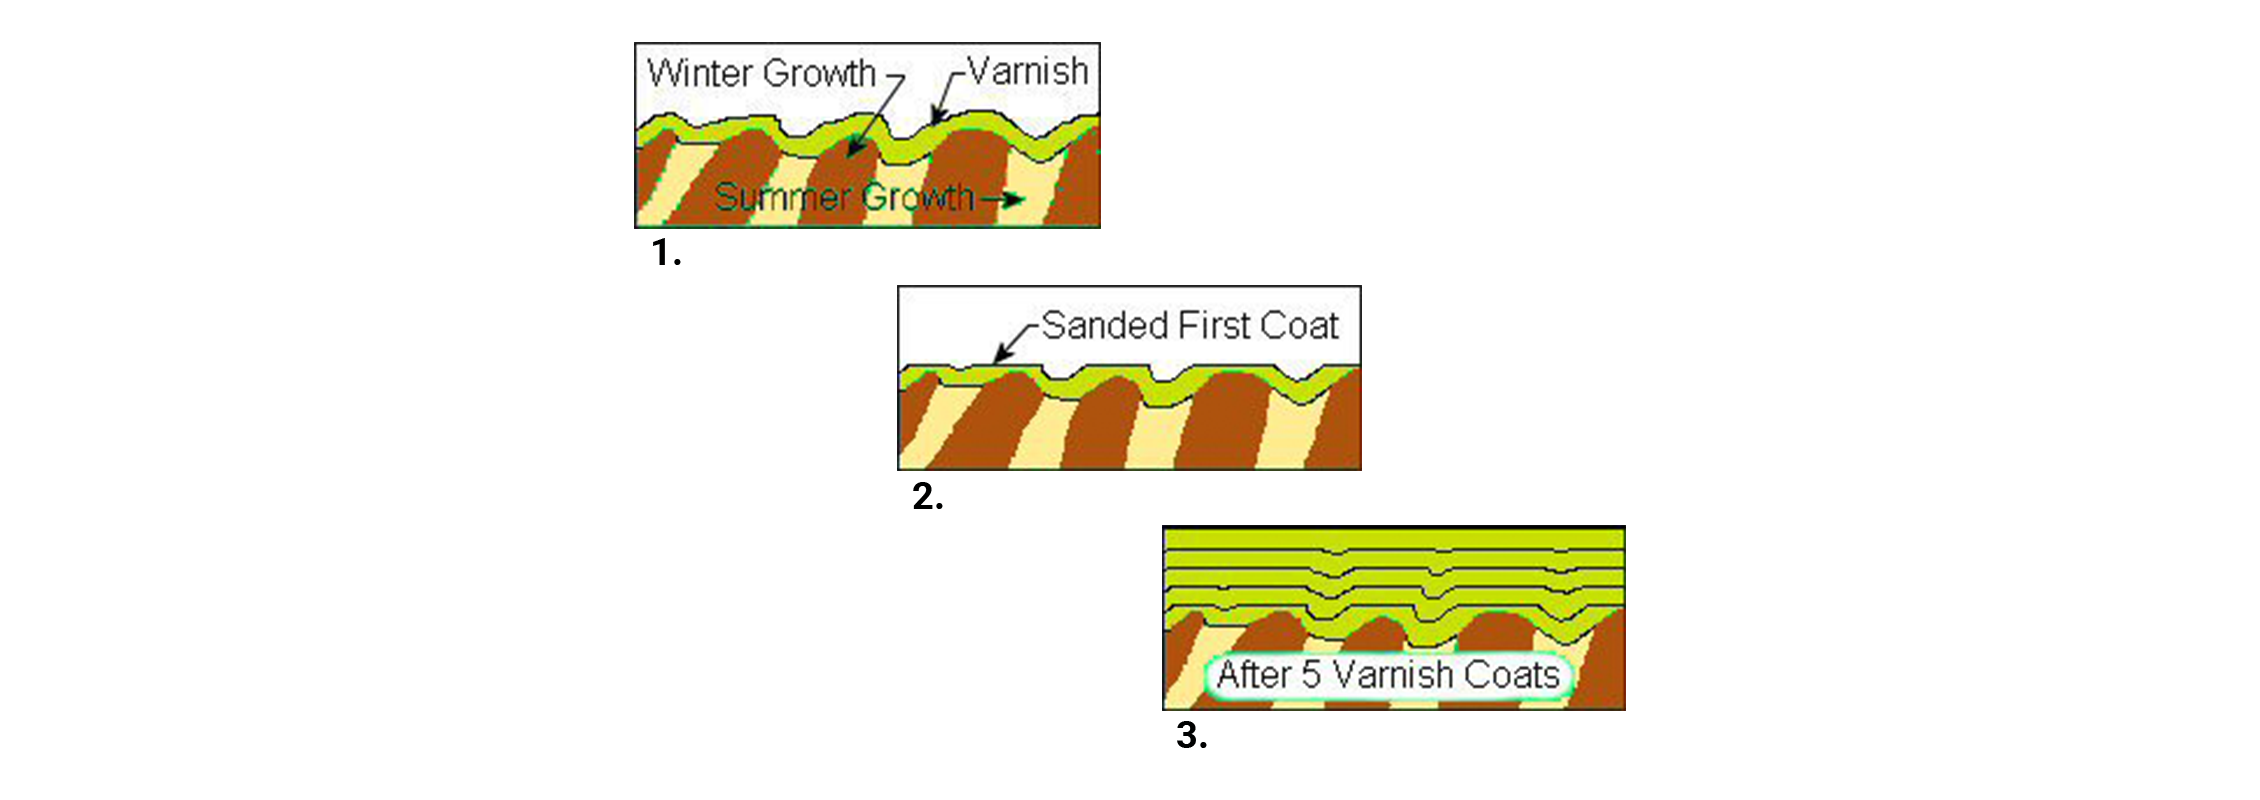
1. A coating of varnish remains fairly uniform on top of this landscape, so a thorough sanding between coats knocks the tops off the “mountains” while allowing the “valleys” to become filled with varnish.
2. With enough coats, the “valleys” fill up and the surface of the varnish flattens out.
3. Please remember to use a sanding block to ensure that your fingers do not push the sandpaper down into the valleys, or it will take a lot longer to build up the finish to the point where it is ready for the final coating of varnish.
Thinners
There is a temptation to quickly build up varnish, but the first coat should always be thinned with the appropriate thinner so it is absorbed by the wood and bonds deeply into the surface of the wood. To avoid unpleasant surprises, be certain to use the thinner recommended by the manufacturer, and follow their directions for thinning proportions.
Some manufacturers even offer “sealers” that are compatible with their products, and some sealers are made specifically for oily woods, such as teak. This “primer” coat is essential, otherwise, the varnish sits on top of the surface and is very susceptible to lifting off in large sheets at a later time.
Building up a finish
If you really want to build up the finish quickly, you can try to “double-coat” a standard varnish (after you have passed the primer coat stage and reached the full strength point) by applying a coat in the morning, and then applying a second coat later in the day without sanding in between. This is a little risky with plain varnishes because you need to wait just long enough for the first coat to dry sufficiently so your brush does not disturb the lower level, but not so long that the bond between the first and second coats is less than desired. Also, remember that a “double coat” needs to be thoroughly sanded down to knock off the high spots.
There are a number of “no-sanding required” varnishes available, but these have extended drying times so you are essentially double-coating and subsequent coats should be applied soon or the adhesion between the varnish coats is diminished. If you wait too long between coats it is best to sand a little so there is some tooth. If you are in a hurry to build up the finish and know that you will be able to apply several coatings in a very short time, these can be great. However, be aware that the final coat may require a few days wait before a final sanding to achieve a perfectly flat surface. Always follow the directions from the manufacturer, which are typically printed right on the can.
Some “quick dry” varnishes do not have UV protective additives, and although they allow for rapid buildup, these need to be over-coated with a spar varnish that does contain UV filters or you will be disappointed at how quickly the surface becomes dull and the finish starts to flake off in large dry sheets when it is exposed to the sun.
Once you have reached the point where the surface is uniform and flat, it is generally a good idea to put on several more coats for protection. Then, in subsequent seasons you are free to sand away without fear that you will sand through the finish and expose bare wood. The varnish coat will be durable, the wood will be well protected, and the look will be that of a “great varnish job.”
Dust in Varnish
Dust can be a problem, but usually only in the final coat, so it is a good idea to “practice” setting up your varnishing environment with each coat that you apply and pretend that every coat is your final one.
Use a tack cloth (or “tack rag”) between each coat to pick up any surface dust that a vacuum may miss. A tack rag can be made by taking cheesecloth and soaking it in a very slow drying oil, such as raw linseed oil or pure tung oil, but a commercial tack cloth can be much less costly and messy in the long run, and you do not have to worry about it drying out. You do not need to rub the surface hard at all, just a very light pass of the tack rag over the surface should be sufficient. Keep the tack rag in a small can with a cover to keep it fresh, and when the tack rag is filled with dust it can be discarded.
If you encounter a dust problem during the “build-up” of coats, it will be sanded down so there is little need to worry about it and you will be ready when you eventually try for the “real” final coat. One tip for keeping airborne dust down to a minimum is to wet the floor of your varnishing area and wait about a half hour before you start to varnish.
Supply Cans
Most varnishes cure via a combination of oxidization and evaporation of the volatile thinners that are added. It is always best to pour the varnish into a supply can rather than varnish directly from an open can. This will limit the exposure of the remaining varnish to the air and prolong its working life.
Discard any unused varnish rather than pouring it back into the original can, or pour it into a “slop” jar so that it can be thinned down and used for a primer coat. You should always use fresh varnish to finish up any project and use the “recycled varnish” for prime coats or other non-essential projects.
Your supply can may be drained, allowed to dry, and then reused for the next coat. You will quickly learn exactly how much you need to fill up your supply can for a complete coat, but you are always better off going back and topping off your supply rather than trying to paint directly from an open can.
Bubbles
It is so easy to introduce bubbles that never seem to go away, that some old-timers say that you shouldn’t even look at varnish. If you need to add thinner, stir it into the varnish slowly but you should never shake it unless you do so the day before you plan to use it.
A solid wire fixed across the top of the supply can make a great place to mop off the excess varnish from your brush prior to touching the wood surface because it keeps the bubbles to a minimum. If you need to stir your varnish (as in a semi-gloss that has solids at the bottom of the can), stir it several hours before you start to varnish so that any bubbles you may create have had a chance to dissipate.
It is best to varnish in the shade, but if you cannot shade your work, wait for the sun to warm the wood or you may find that those tiny bubbles from your brush become very large balloons that dry hard and must be sanded off.
A small number of large bubbles can be attacked with a razor blade or pin while the varnish is still wet and will flow out. This repair technique is a bit dangerous, as it can cause more damage to the finish than the bubbles themselves (which may dissipate if left alone) and should definitely be avoided in the final coat. A large number of small bubbles is normally a sign that something in your technique of laying on the varnish needs to be looked at more closely.
Brushes
The brush that you use can make a huge difference, so a badger brush with very soft bristles is normally recommended. Less expensive, disposable or throw-away brushes may be acceptable for the initial coats, but they tend to produce a lot more bubbles in the finish so do not use them for the final coat. The best rule is to avoid bubbles, so buy the best brush that you can afford and take care of it, cleaning it completely between each coat so that dust specks and loose bristles are removed before you get to putting on that “final” coat. You need to “flow” the varnish out of your supply can and onto the surface of the wood, but having to stop and fish out loose brush bristles can slow this process down.
Also, you will want to brush backward into a “wet edge” of varnish and let the wet varnish level itself, but if you take too long, your “wet edge” can start to tack up and you will leave many undesirable brush marks behind.
If you are getting lots of brush marks and you are not over-working your brush, you can try thinning the varnish a little (about 10% maximum) or adding a very small amount of Penetrol to get the varnish to flow out after your brush leaves the surface, but watch out for excessive amounts of additives. And, be certain to stir the varnish thoroughly without introducing bubbles to mix in whatever you decide to try. Remember that if you thin the varnish during the later stages of varnishing, it will take an extra coat or two to fill the grain of the wood and build up a suitable coating, so it is best to use the varnish at full strength if possible.

Supports
It is especially important to varnish all around a workpiece, particularly if it is made of teak and installed on boats because any place where moisture can enter under the edge of the varnish will eventually cause the finish to lift. You will need to support your work in a steady manner so you can push the brush against it without your workpiece giving way and collapsing.
If there are holes in the workpieces, it is a great idea to thread a bolt or screw into the holes so you can hang the work. Hanging your work is ideal but you need to make sure that you have enough supports to keep your work from swinging around as you try to press your brush against it.
An alternative would be to use triangular pieces of scrap wood to lay underneath so that only the pointed surface touches your work. Or, use screw points (the “bed of nails” approach) that are driven up through scraps of wood. Just be sure to use enough points so that the work is not wobbly, and move the points of contact around with each subsequent coat of varnish.
Varnishing
Once you are ready to lay on the varnish, you will need a light source that you can place at a remote distance so you can see across the surface of the wood and notice any gaps or “holidays” in your work as you lay on the finish. A window or a Spotlight can be used as long as there is strong enough light to make it clear to you as you work. You will want to minimize the brush strokes that you use in order to keep bubbles to a minimum, so don’t mop the finish around, and always plan to keep a “wet edge” in your work. This allows you to brush backwards into the wet edge of the finish so brush marks have a chance to settle out.
Try to “feather’ your brush as you brush it backwards into the wet edge, which means lifting the brush at an angle as it leaves the existing wet edge. It takes a bit of practice, which is another reason why it is a good idea to practice with each coat and pretend that it is your final coat.
The amount of varnish that you lay on the surface can be very difficult to gauge, but it should be as much as possible without causing excessive sags in the dried coat that need to be sanded out. Don’t worry about it at first, because you will learn as you go and you will apply the appropriate amount by the time you reach the final stages. Just remember to “flow” the varnish out of the can onto the surface of the wood and use as few brush strokes as possible in the process.
Spar Varnish
Please note that marine “spar varnish” tends to be softer than furniture or floor varnish, particularly in the sun or when it is very hot. Some brands will even feel “sticky” when they are hot, long after they are fully cured. This is a natural effect that allows the varnish to expand along with the wood in the extreme marine environment. Modern spar varnishes also have UV inhibitors added to block the damaging effects of ultraviolet radiation from the sun. For these reasons, you should never use floor varnish outside on your boat and it is not recommended to use spar varnish on the floors of your house or on furniture that will be subjected to long periods of sitting unless you don’t mind seeing the seat of your pants permanently imprinted in your priceless heirloom.
The choice of which brand of varnish to use is a very personal one, but it is always a good idea to stick with the same brand throughout the process of building up the finish. Once the varnish has completely dried, you can overcoat it with virtually any other brand that you desire, but you may encounter incompatibility issues during the initial stages when the underlying coats are not completely cured. Also, if you try to mix epoxy as an underlayer and overcoat it with varnish, make sure that you are using compatible products.